Decision trees - worked example

This section is a worked example, which may help sort out the methods of drawing and evaluating decision trees.
The Property Company
A property owner is faced with a choice of:
(a) A large-scale investment (A) to improve her flats. This could produce a substantial pay-off in terms of increased revenue net of costs but will require an investment of £1,400,000. After extensive market research it is considered that there is a 40% chance that a pay-off of £2,500,000 will be obtained, but there is a 60% chance that it will be only £800,000.
(b) A smaller scale project (B) to re-decorate her premises. At £500,000 this is less costly but will produce a lower pay-off. Research data suggests a 30% chance of a gain of £1,000,000 but a 70% chance of it being only £500,000.
(c) Continuing the present operation without change (C). It will cost nothing, but neither will it produce any pay-off. Clients will be unhappy and it will become harder and harder to rent the flats out when they become free.
How will a decision tree help the taking of the decision?
Process:
- Draw the decision tree representing the options open to the property owner.
The tree starts with a decision point, a node, so start the tree with a square.
Three lines radiate from this, representing the three options. Label them carefully.

Figure 1 Decision options
- Add the chance nodes, the probabilities and the outcomes.
The options end with possible outcomes, so mark with a circle. In this case there are two possible outcomes for the investment options, and only one for the 'as is' option. Add all the data to this diagram.
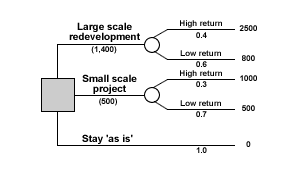
Figure 2 Decision tree with options and probabilities
- Calculate the expected values
Now start to calculate, starting from the right. Multiply the outcomes by the relevant probability, and then add the answers together for each option. Put answer above the appropriate circle.
Tree diagram now looks like figure 3 below:
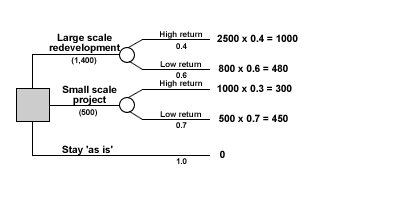
Figure 3 Decision tree diagram with outcomes and returns
- Calculate the net expected value
The final stage is to adjust for the costs of the options. Now subtract the costs of each option from the expected value, and mark the calculation on the diagram. Reject the options with the lowest net expected value.
The final tree diagram is shown below.
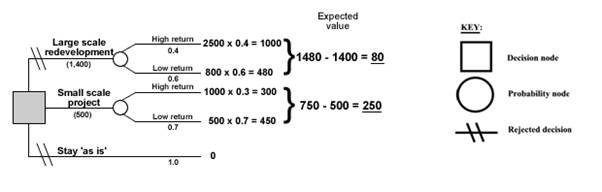
Figure 4 Completed decision tree diagram
Use of decision tree diagram
So, now advise the owner what to do. What would your be? Jot down some ideas and then follow the link below to compare your notes with ours.
Decision tree - advice
More than one decision - a more complex decision tree
The decision trees shown to date have only one decision point. It is possible that questions asked in examinations have more than one decision. The way to look at these questions is to imagine each decision point as of a separate decision tree
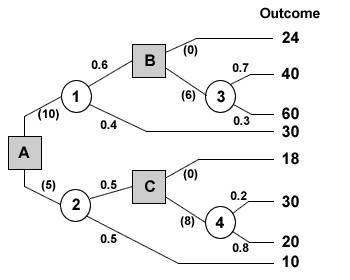
In the diagram above, treat the section of the tree following each decision point as a separate mini decision tree. In this case there are three distinct diagrams with decision points A, B and C as the three starting points. The net expected value at the decision point B and C then become the outcomes of choice nodes 1 and 2.

- Using the decision shown above, calculate which option should be selected on purely financial grounds. Show all your calculations to support your answer.
- Analyse the advantages and disadvantages of using decision trees.

In more complex decision trees it is better to calculate the expected values away from the diagram and add just the result to the diagram.
Node:
1.
0.6 x 40 = 24
0.4 x 30 = 12
Total: 36
2.
0.5 x 18 = 9
0.5 x 10 = 5
Total: 14
3.
0.7 x 40 = 28
0.3 x 60 = 18
Total: 46
4.
0.2 x 30 = 6
0.8 x 20 = 16
Total: 22
